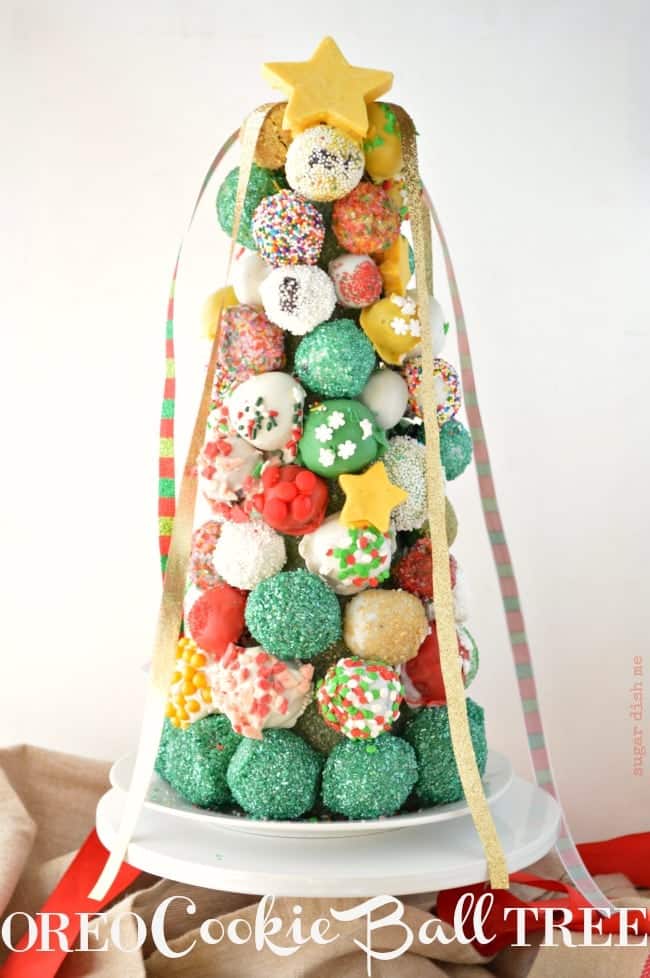
This Oreo Cookie Ball Tree is almost too pretty to eat! Almost. Learn how to make this delicious centerpiece for all your holiday celebrating.

I made this! It was really easy! So I had to share it because … well mostly because I was feeling extraordinarily proud of myself. But the rest of my reasoning was all about you.If I can do this, you can too (you all know my decorating skills are about as basic as they come).
Before we get started on how to make this super fun Oreo Cookie Ball Tree, I have a confession to make: I’d never before made Oreo Cookie Balls.
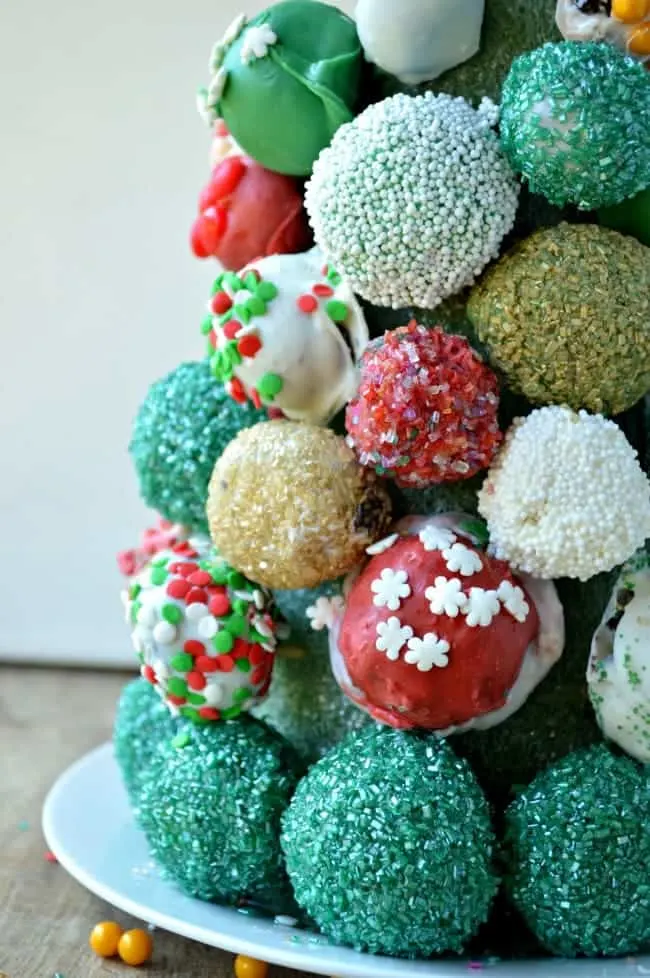
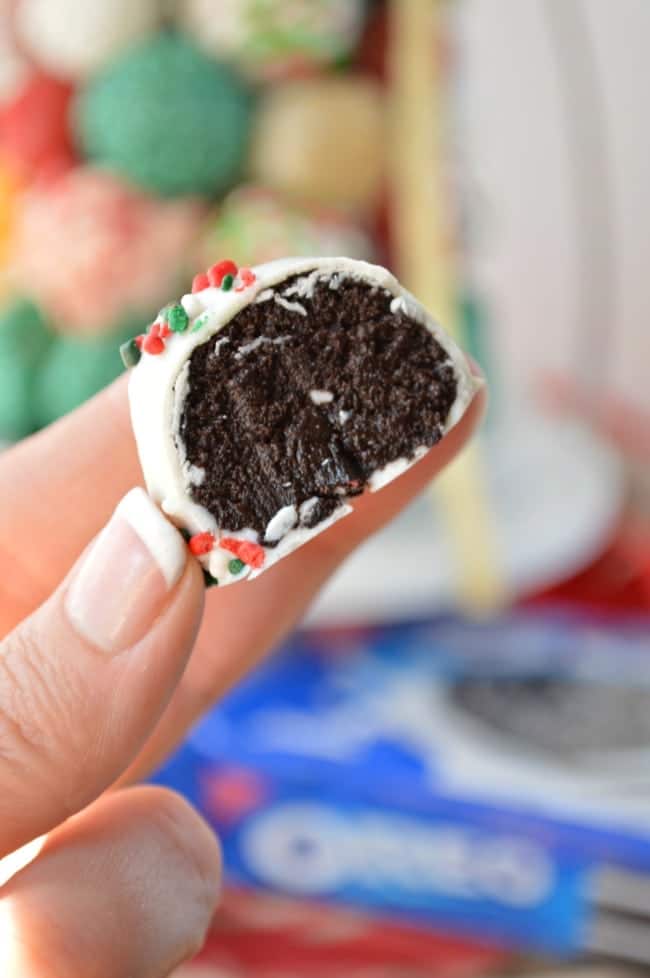
This is definitely one of those times that I’m late to the party. As in… the last person through the door. Oreo Cookie Balls are made of Oreos (duh), cream cheese, and melted chocolate to coat. I used Wilton Candy Melts to add some color and festivity to my tree, and the beauty of this project is that you can really make this into any sort of tree you’d like! If you decorate with silver and gold, you can do that. If you prefer a traditional green tree, I have you covered. If you are a chocolate traditionalist and adore the ultra dark chocolate coating with sparse decorations, this still works.

Typically, another reason I shy away from getting too food-decoratey, is because you have to visit a craft or specialty store to buy all the stuff. More often than not, I don’t have time to work another stop into my day, nor do I need to be wandering around the craft store spending another $150 on who-knows-what (I WILL find something at the craft store; there is no doubt).
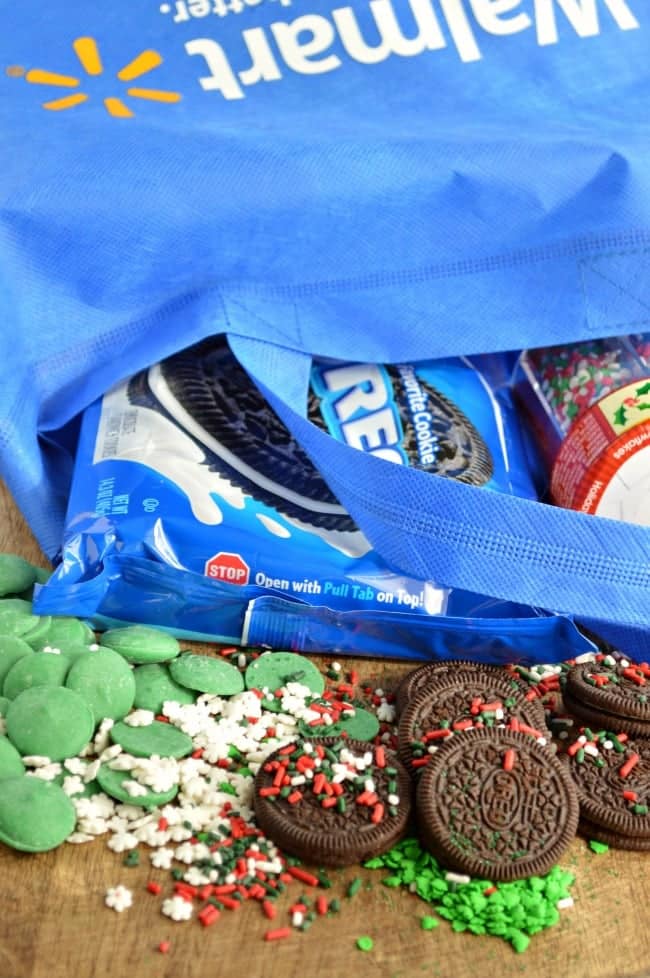
I found every single thing I needed to make my Oreo Cookie Ball Tree at Walmart. The Oreos, the candy melts, the fun sprinkles! I found the styrofoam floral cone and the ribbon in the craft section (without blowing my budget), and all the skewers I needed to fasten with the toothpicks and paper products.
Once you have all your stuff and you are ready to rock, I do have a few tips. In case you happen to be even later to the party than me (and thank you for making me feel better about my perpetual lateness).
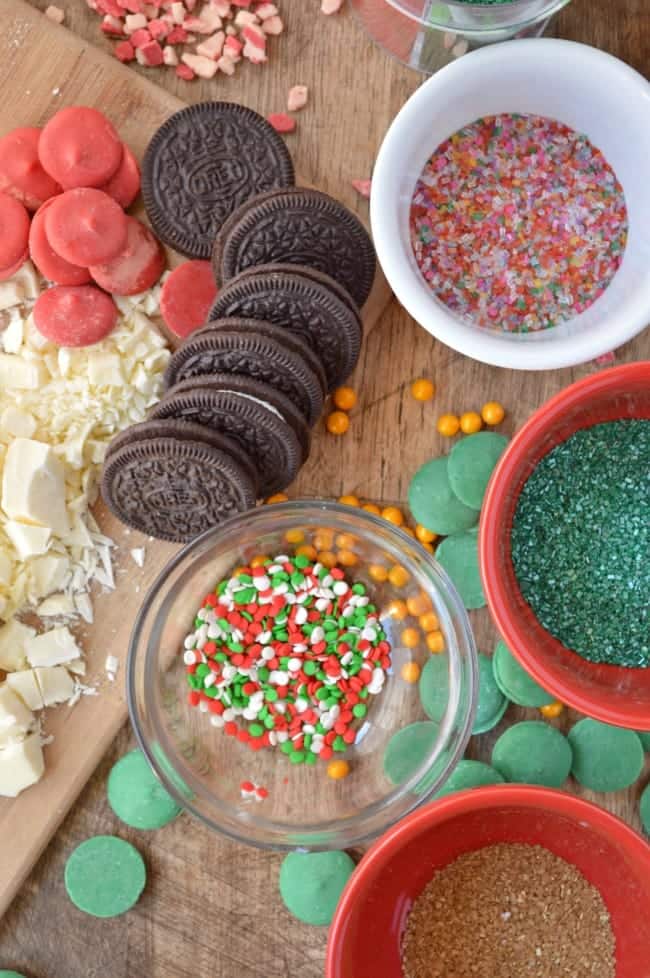
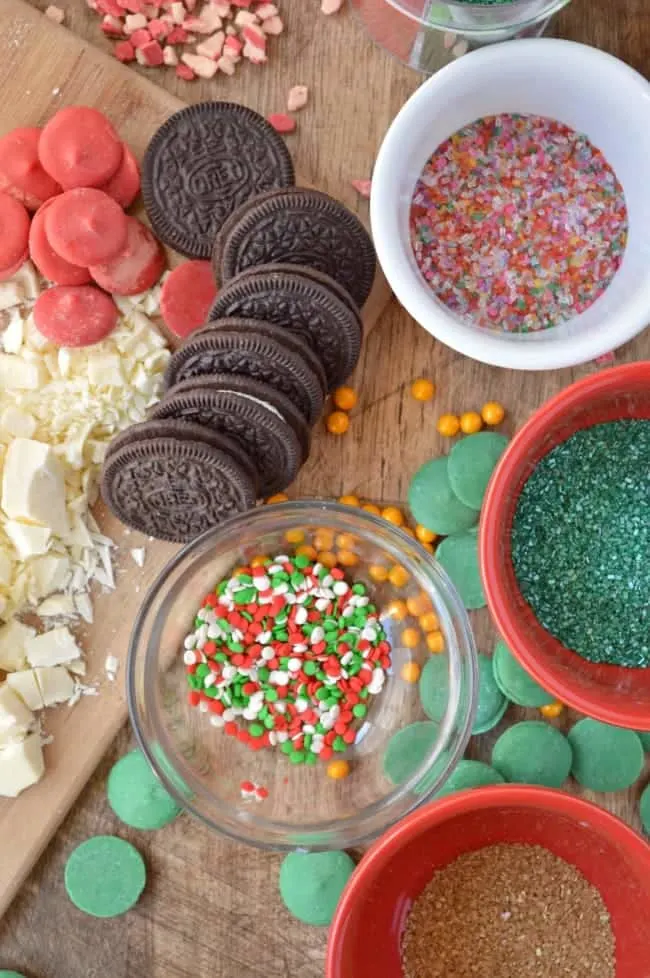
- When making your Oreo Cookie Balls, it helps to keep a couple of clean utensils handy (I use forks!), and rinse them often! Otherwise sometimes the dark chocolatey filling can tamper with the color of your coating.
- Work in small batches. The freezer time helps to keep the soft cookie ball filling from melting when you dip each one into the chocolate or candy coating. But even if you freeze your cookie balls overnight, they thaw quickly! They also set up quickly once coated, so it’s best to work with just a few at a time.
- If you like the look of a cookie ball covered in sprinkles (like the green Oreo Cookie Balls pictured below), you’ll need to fill several round ramekins with your sprinkles. After you coat each ball, drop them in one at a time and swirl the sprinkles around in the dish to coat.
- I find that having a partner – or two – handy (grab your sister, your best friend, or your kids!) is really helpful. One person to dip, one person to decorate before the chocolate sets up.
- Be creative! These get easier as you go. After the first few you’ll see how simple and fun this Oreo Cookie Ball Tree is.
- Sprinkles and candies are the most cost-effective ways to decorate each cookie ball ornament on your tree. You can, however, get a little crazy in the craft aisle with edible markers, glitter, pearls, baubles, and color sprays.

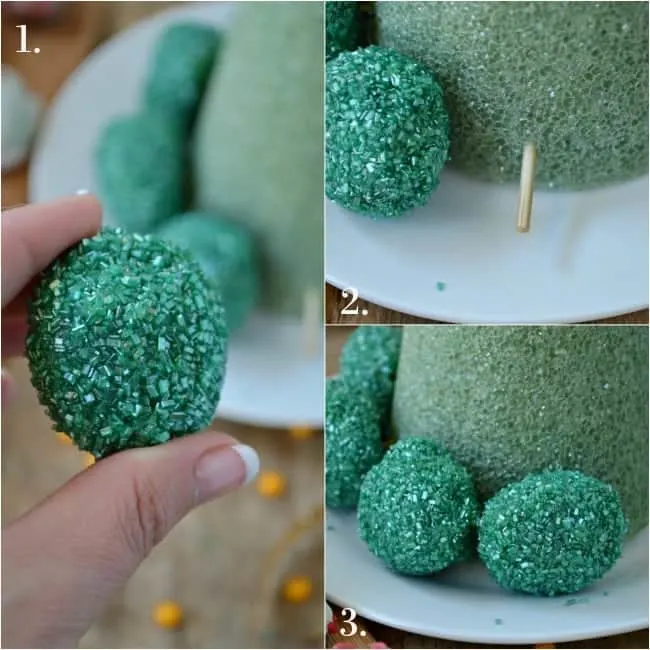
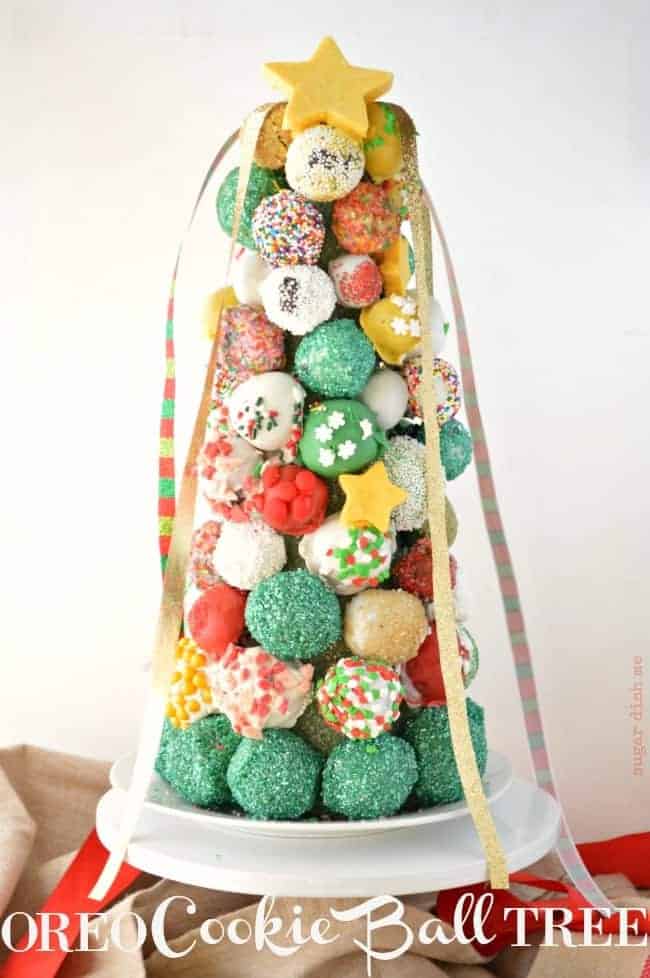
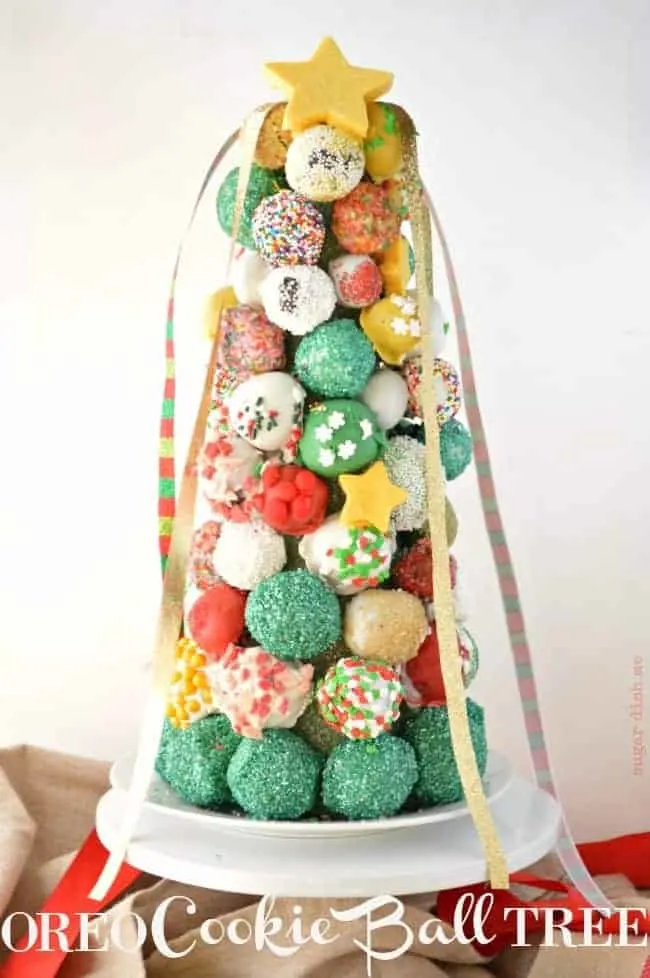
Once you have made MOST of your cookie balls, you can start to assemble your tree. I used small appetizer skewers to fasten mine to my green styrofoam cone. I find that it’s easiest to poke into the styrofoam with the sharp end of the skewer and then use the blunt end to hold each cookie ball in place. Start at the bottom and work your way up in a circular pattern.

Once you get towards the top, it is easiest to snap the skewers in half (so that they don’t poke all the way through). Just be sure there aren’t any splintery ends.
I used additional Wilton Candy Melts and little fondant cutters to create the stars for my tree, and then I pinned some pretty ribbon up top.


This is an easy dessert to make ahead, just keep it refrigerated until you are close to ready to serve.

Oreo Cookie Ball Tree
Note that the prep time listed is only for making, chilling, and coating/decorating the Oreo Cookie Balls. You'll need to allow at least another hour to make the actual tree. These steps can be broken up and done over a couple of days if you'd like to work ahead.
Ingredients
1 1/2 Oreo Cookie Ball Recipe Ingredients Follow:
- 12 ounces (1 1/2 8 oz.pkg.) brick cream cheese, softened
- 66 OREO Cookies, finely crushed (about 5 1/4 cups), divided
- 6 pkg. (4 oz. each) semi-sweet baking chocolate, melted (note that this is for CHOCOLATE COATED Oreo Cookie Balls Only; if you are using additional candy coating you can cut this amount down)
Instructions
- MIX cream cheese and cookie crumbs until blended. (You can reserve up to 1 cup of the cookie crumbs for topping the cookie balls if that's how you are decorating.
- SHAPE into balls. A standard Oreo Cookie Ball is 1". I made slightly larger cookie balls for the base of the tree and some that were slightly smaller for the top. The variation in sizes adds to the "ornament" effect. Freeze 10 min. Dip balls in melted chocolate or candy melts; place in single layer in shallow waxed paper-lined pan. Sprinkle with remaining cookie crumbs and/or all the sprinkles, candies, and edible decorations.
- REFRIGERATE 1 hour or until firm. Keep refrigerated.
- To Assemble Your Oreo Cookie Ball Tree:
- First place your foam cone on whatever plate you are using for the base. This will make it easy to start and stop as needed because you can just pop your tree in and out of the fridge.
- Next, starting at the bottom of the cone and working your way around in a circle, insert the sharp end of a skewer into the Styrofoam until only about 3/4" is poking out. Fix the flat end of one of the larger cookie balls to the skewer. **Tip** If the chocolate on the flat side doesn't give easily, poke a hole into it with a skewer and then fix it to the cone.
- Repeat the process, working around and up until you reach the top of the Styrofoam cone.
- Pin the ribbon to the top and refrigerate until you are ready to serve.
Notes
Tools You Need:
1 (12" X 4" ) Styrofoam Floral Cone
approximately 60 small skewers
1 1/2 Oreo Cookie Ball Recipes (below; a standard recipe makes 48 1-inch cookie balls)
additional Wilton candy melts (if using)
sprinkles, candies, and any other edible decorations you'd like to use
wax paper
ribbon
A serving size is ONE 1" Oreo Cookie Ball
Nutrition Information:
Yield:
60Serving Size:
1Amount Per Serving: Calories: 79Total Fat: 4gSaturated Fat: 2gTrans Fat: 0gUnsaturated Fat: 2gCholesterol: 4mgSodium: 66mgCarbohydrates: 10gFiber: 0gSugar: 6gProtein: 1g
I easily found all my ingredients, including Oreos, cream cheese, and Wilton Candy Melts at Walmart.
Learn more about the different varieties of OREOs available at Walmart for your next baking project! www.WalmartOREO.com
This post is sponsored by OREO. All images, content, and opinions are my own.

mary
Wednesday 22nd of November 2017
Fun idea,your very creative!
Heather Tullos
Friday 24th of November 2017
Thanks, Mary!
Miranda
Tuesday 29th of November 2016
This is such a cute idea! I'm all for having an edible Christmas tree!
Melissa Howell
Friday 18th of November 2016
Heather, this is AMAZING! You are super talented!